Pages

La Vie En Rose Cards


La Vie En Rose My Reflections collection is a very flexible set of papers.  The samples shown here take advantage of the rose B&T and the red motif. Use it to get a jump start on Valentine's Day or anniversary cards, or think outside the box.


But the majority of the B&T paper pack is actually basic Black and White Daisy patterns. They can go with anything you want them to match.  Use direct to paper technique or sponge ink on the paper.
La Vie En Rose

La Vie En Rose Scrapbook


La Vie En Rose is a very versatile kit of black and white (with a little bit of rose). The La Vie En Rose My Reflections collection includes a paper packet of double-sided B&T paper, badge buttons with flower images, and a coordinating sticker and die cut packet. Check out the coordinating gold accents, sequins and foil tape, to match! 


For more ideas using the La Vie En Rose Collection, check out media channels using the hashtag #ctmhlavieenrose


Watercolor Christmas


CTMH Watercolor Paper and Watercolor Paints are so much fun to play with.  The card above is made with the White Pines Cardmaking WOTG stamp set.  

To make the slanted hill, I tore a scrap paper from one corner to the other, slightly bigger than the watercolor paper (I did watercolor paper at 6" square and scrap was 7" square).  I taped the top part of the scrap paper to the left of the desktop and the bottom part the right.  I slide the watercolor paper inside the left scrap and used a mixture of white, gray and tan watercolor paints to make a hill, making sure the darker grey/tan colors were at the top to create a "shadow".


 Once the hill dried, I slide the watercolor paper below the right scrap to stamp and paint the trees and background.  In the card above, I stamped the trees first, and watercolored inside the trees with green and the night sky outside with blue and gray.  The snow is heavily pigmented white watercolor flicked from a paint brush held high above the project.  The watercolor paper was cut down to card size and a sentiment stamped on the hill.

 
This version of the watercolor image uses watercolors first, then stamped the trees on top.  But I liked the precision of the first image instead of the artsy version.  Both have really pretty night skies and I love the texture of the snowy hill.

Santa's Wallet


Santa's Wallet is a cute card that I've seen throughout Pintrest and the web. It's a super easy card, and was also easy to make into a gift card.  The card base is a solid Cranberry Cardstock and the belt is solid Black Cardstock.  The belt buckle is a Cricut cut in CTMH's glitter paper, with a Bitty Sparkle in the center.  The center of the gift card is two simple pockets on left and right.  One side is a sentiment card to sign, while the other is the place for the gift card.


Peek a boo Christmas Tree


This optical illusion card idea comes from Yellow Bear in NZ. It uses a simple A-2 sized card, but with the center of one side cut out.  The trees are the things that keep it together.  All of the stamps are from the White Pines Cardmaking technique workshop that I taught (don't miss out next year!).


Inside, I stamped another Christmas tree in the center.  You can stamp another sentiment inside, as well as sign the card.  It adds more color to the card using the multiple colored stamping (dark outline plus inside color).


Snowflake Interactive


Last year, CTMH released another Cricut cartridge called Artfully Sent.  It is a super fun, interactive card cartridge. It also has many cuts for Picture My Life style scrapbooking.  On one of the keys, it has a snowflake flip card, but the snowflake wasn't very big.  So I cut out two large snowflakes from the Artiste cartridge and made my own flip card.  In the Holiday Expressions Idea Book, we also released silver snowflake charms which is attached in the center of the Snowflake.  To show the versatility of the White Pines kit, I tried a different color scheme.  The card base is Fern; the B&T is from the WOTG; and the snowflakes are cut from White Daisy and Glacier cardstock. 

Waterfall Christmas


The waterfall technique is a well-known card style.  You can find a tutorial about how to make one at Splitcoast.  I switched up the waterfall part so the card was sideways to work for my idea.  At CTMH, we sell stickers to go into Base and Bling jewelry, but not everyone is into making jewelry.  But the stickers are still very useful in paper crafting.  This card utilizes the Base and Bling Jolly Holiday Style Sheet from the Holiday Expressions. 


The card background is handmade, second generation Fern and Cranberry ink, using the White Pines Cardmaking WOTG stamp set.  A little Fern twine helps the reader pull out the waterfall.


Gift Card Ornaments


The White Pines Cardmaking Workshop has a set of double-sided B&T paper.  One side was really easy to use and subtle.  The other one was brighter, and more difficult to utilize.  I thought about how to tame it down, and this card is the result.  With all of the white space from the card base, it helps to keep the focus on the ornaments, without being overwhelming.  And it is super easy too!  I cut two flat ornaments, and made one 3-d ornament.  The 3-d ornament is three circles cut the same size, folded in half, and glued together.  I edged all of the circles in Cranberry ink to make them pop even more.  The Fern Twine from the kit made perfect hanging strings.


Around the holidays, we tend to send out gift cards a lot. We have a lot of family scattered around the country, so gift cards are always going to be easier than large presents.  This gift card is easy to make  I use a toilet paper roll inside a normal A-2 card, gluing the end of the toilet paper roll so the gift card can only slide part of the way in and not get lost.  Then punched a half circle in both the toilet paper and the card base.  Finally, the toilet paper roll was glued inside the card and the card completely glued closed.  This card doesn't open like a traditional card.  The card giver can sign the back, and the whole thing fits in a normal envelope.  Pretty neat way to recycle empty toilet paper rolls!

Merry Christmas Fab Friday Gift card


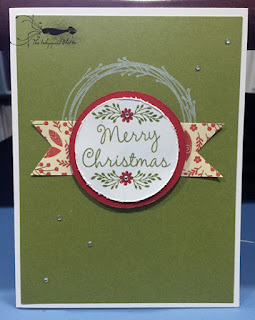
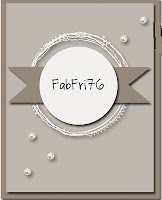
Even though the week is over, this Fab Friday sketch was fun to use with the wreath in the White Pines Cardmaking WOTG.  The little Bitty Sparkles fit right in as part of the layout.  I stamped the wreath image using pigment White Daisy and heat set first.  The white circle was stamped with Fern and Cranberry ink.  The Bitty Sparkles are the center of the flowers.  The whole thing is attached to the Fern Cardstock with 3-d Foam tape. 


The inside is a holding place for a gift card.  I used two regular A-2 card bases.  I scored one of the sides of each card and glued them together, leaving the center area without adhesive (someplace for the gift card to sit in).  Using a circle punch, I cut out the center notch to make it easier to pull out the card.  Decorate the inside as you wish.

Check out other ideas using this sketch by clicking on the image below.

http://fabfridaystampinchallenge.blogspot.com/2015/10/fab-friday.html

From our house to yours...


The White Pines Cardmaking WOTG stamp set is really fun to work with.  In this card, I used multiple techniques.  The background is the Smoosh technique with an embossing folder where you add ink to the raised side of the folder and sandwich the paper in the folder.  Run it through the embossing machine and you get nice grout.  The wreath is stamped in several different generations of Fern ink plus a darker color, New England Ivy.  The bird is cut out from the Cricut, and tied with Fern twine.  I love this idea that came from Pretty Impact.

Planners Gonna Plan


Attention all planner addicts! During December, you can get your hands on the new, gorgeous Everyday Life™ album from Close To My Heart, the accompanying Everyday Life 2016 planner pages, and the coordinating Everyday Life Perfect Plan roller stamp in an exclusive product bundle for only $29.95. That’s over 15% off the retail price! With the new Everyday Life line, you’ll experience “memory keeping on the go” as you track your menus and shopping lists, stamp reminders, keep appointments, and tuck away precious memories—plus much more—all at once! This offer is only available while supplies last, so plan to place your order early in the month and start 2016 off right.

SOTM: Candlelight Garden


Friends are people that we sometimes tend to forget during the holidays, when we are surrounded by our family. Candlelight Garden is a lovely way to celebrate your friendships with a little gift or card. Send a "bouquet" or thank them for their friendship. This stamp set is pretty versatile, and can be used for other subjects like fireflies in a jar, hanging lights for Christmas or New Years, Mother's Day or Valentine's day flowers.


White Pines cards


White Pines is a great Reflections kit with a Christmas theme.  These cards show off our great Fern twine, thick and twisted cotton.  The stamp set, called Holly Jolly Christmas, is from the Holiday Expressions 2015 book.  Three of the images in this set match the Artistry Cricut cartridge.


You can also see the new Red Enamel Gems sprinkled around the Merry Christmas sentiment.


Card patterns are really easy to follow in the How To Book series, Originals, Wishes, and the two volumes of Make It From Your Heart.  Whip up a few Christmas cards quickly with any of these book patterns.


Make Your Own Calendar


My Creations Calendar

Every time you tear a leaf off a calendar, you present a new place for new ideas and progress. -- Charles Kettering

The My Creations Calendar can be a wonderful gift for a family member, or a great way to display your photos year round. Use traditional scrapbook pages or Studio J printouts to decorate the pages. Stamps and stickers can be used to decorate the gridded month pages by adding titles, day numbers, and specific dates on the calendar.


White Pines Scrapbook


White Pines Workshop on the Go is a great way to get in the holiday spirit.  The kit comes with Cardstock, patterned paper, stamps, doodads and instructions to make 2-two page layouts.  But you'll have leftover paper, so you can stretch the extras to even more layouts.  Check out some ideas using this fun workshop.


White Pines


White Pines My Reflection Collection
White Pines is a festive new kit with winter theme for all your holiday images. The White Pines My Reflections collection includes a paper packet of double-sided B&T paper, badge buttons with whimsical images, and a coordinating sticker and die cut packet. Check out the coordinating Picture My Life cards and Fern Twine or shimmer trim to match! Once you create a page with winter photos, display it in a Colonial White Shadow Box for everyone visiting to see.

For moreideas using the White Pines Collection, check out media channels using the hashtag #ctmhWhitePines

Easy, Peasy Cards


 A Cut Above Card Kits

The new Cut Above pre-cut card kits, Berries and Boughs and Deck the Halls, save you time and planning, without sacrificing creativity, and include almost everything you need to create 10 beautiful hand-stamped cards. The only extra supplies you'll need are adhesive, a My Acrylix block, Exclusive Inks pads, and one of the coordinating stamp sets, which you can re-use on a variety of projects or to createmore cards. No paper trimmer is required!


Washi Thanks


Whenever I create a card workshop, my last card usually takes scraps and makes something from leftovers.  A lot of the time, the leftovers are long, really skinny pieces of paper, like 1/2" - 1" wide.  These tend to be the same widths as washi tape.  But sometimes I can't find washi tape in the exact color.  So combining the skinny pieces of paper and stamps, you can create your own.  Papertrey Ink has a great tutorial on how to make your own washi tape.


In my case, I didn't make my own washi tape and then attach it to the card.  Here, I tore the strips of B&T paper in alternating lengths.  I also directly stamped on the card base (like the Pear Ink stars).  Washi tape stamp sets can also be used to create homemade washi tape, like the Blossom Cardmaking Kit stamp set or the Snapshot Memories set.

Here is an alternative to the "Thanks" card.  The Cricut Collection, Artiste, has great celebration stamps and images.  The banner below is stamped in Smoothie Ink and Coral Sequins flank each side.


Simply Fundamental Scrapbooking Workshop


Experience the beautiful Simply Fundamental Scrapbooking workshop—available only during November! This workshop has been created using all the items featured in our campaign exclusive My Legacy™ album bundles, available during November for $71.80 each! When you purchase the album bundle, you will also qualify to receive a value pack of side load or top load Memory Protectors™ FREE—a savings of $19.95! Along with the album style and design of your choice, each bundle includes one Paper Fundamentals Enchantment pack, one Fundamental stickers Enchantment pack, one Peacock Fundamental assortment, and three sheets of White Daisy cardstock. You will then be set to turn these beautiful products into fabulous layouts using the new Simply Fundamental Scrapbooking workshop featuring five layouts you can make using all the supplies in your bundle. 

Celebrating You


I like using scraps to make my cards.  It helps me use up paper without throwing it away, and it ends up making me feel more creative.  The two large flowers and the large sentiment makes this a nice visual triangle.  Change up the colors of the cardstock to make the flowers suitable for whatever season you are sending the card.


The technique used on this card is from Splitcoast called Crinkled Cardstock.  You can find more information here.   Cut three circles in ever increasing size, spritz them with water, then crumple them up into tiny balls.  After squeezing them a bit, I unraveled them and let the paper dry.  It's important to let them dry, because the paper will tear in the next step.  Using a sanding paper, sand the dry circles to reveal the white core of the cardstock.  Stack the circles, attaching them in between, and secure a sequin in the middle on top.  Also use the crinkled cardstock technique on the leaves of the flower and tuck them behind the flower like below.


SOTM: Cheers, 2016!


With all of the New Year's parties that happen at the end of each year, it's inevitable that we take lots of fun photos with traditional cameras or our cell phones. Get those photos printed out and into a traditional scrapbook, Picture My Life, or Instalife album. Use this month's SOTM to complement your photos and provide journaling lines to tell all of the fun details from the events. Party like it's 2016!
This stamp set is only available during the month of November, so get it now for $5 with your qualifying order.

SOTM: Cheers, 2016!

Sunshine Rays


Every time I look at this card, it  makes me smile.  It's one of my favorite cards I've made, because the colors are beautiful and the sun just pops out at me.   It also showcases several techniques that are really fun to play with.


The first technique is called Spirelli String Art.  Depending upon how you lay the strings, you can make different styles of art pieces.  In this case, I wound the string (CTMH Glacier Twine) every four petals of the Smoothie flower.  Both flowers were cut using the Cricut.  The inside of the flower is from the Blossom Cardmaking kit, stamped in Sunset Ink.


The second technique is called Faux Torn Mosaic and an explanation can be found at Splitcoast here.  Basically, I tore up a bunch of pieces of B&T paper, inked edges with Lagoon Ink (my fav color!) and randomly glued the pieces to the card base.  Make sure to overlap the edges, and then cut them off to make a clean cut.  The sentiment is from the Rain or Shine stamp set.  You can see another card I made earlier here called Summertime Rainbows.

Allow the B&T paper to lay over the edges.  Then cut them clean off.